Silver has a charm that never goes out of style, but anyone who owns it knows the struggle; one day it’s gleaming, and the next day it looks like it hasn’t been touched in years. Tarnish creeps up on everything from a favorite silver ring to the family’s old serving spoons.
The surprising part? Bringing silver back to life is easier than most people think. No specialty cleaners, no complicated routines, just a few well-chosen techniques that work every single time.
With the right approach, dull silver transforms almost instantly, revealing the shine that made it special in the first place. And once someone understands what actually causes tarnish, keeping silver bright becomes a whole lot simpler. It’s a satisfying process, too, the kind where you see results right in front of your eyes.
Why Silver Tarnishes
Tarnish starts forming the moment silver meets sulfur in the air, creating that dull, dark layer most people dread. Everyday things, humidity, lotions, perfumes, even the foods someone cooks, can speed this reaction along. Pollution and strong cleaning chemicals only make the process faster.
When someone knows why silver tarnishes, it becomes easier to pick the right cleaning method and slow down future buildup. It also helps them recognize which habits or environments might be quietly damaging their favorite pieces.
How to Clean Silver: Choosing the Right Method
There are two main approaches depending on how much tarnish you’re dealing with. Light tarnish needs a gentle clean, while darker, stubborn buildup calls for a deeper method. Choosing the right level makes the whole process faster and more effective.
- Light cleaning for everyday grime
- Deep cleaning for dark, stubborn tarnish
Both methods rely on gentle tools and household products.
How to Clean Silver for Light Dirt and Mild Tarnish
This method is ideal for silver jewelry, chains, pendants, flatware, and pieces with non-porous gemstones. It removes fingerprints, light dullness, and everyday buildup without abrasion.
Prepare a Mild Cleaning Solution
Add a few drops of fragrance-free dish soap to a bowl of warm water. Harsh cleaners can leave a residue or react with delicate finishes; mild soap is enough to lift dirt.
Soak for 5–10 Minutes
A short soak loosens the grime inside links, grooves, and engravings. Warm, not hot, water works best, especially around stones.
Use a Soft Brush for Details
A soft-bristle or baby toothbrush reaches into small areas that cloths can’t. The goal is gentle agitation, not scrubbing.
Rinse Thoroughly
Rinse under clean warm water to remove all soap. Any leftover detergent may cause faster tarnish.
Dry Immediately
Use a microfiber or silver polishing cloth. Avoid paper towels; they scratch. This quick process works well for weekly or monthly care and keeps tarnish from getting heavy.
How to Clean Silver with Heavy Tarnish (Baking Soda + Foil Method)
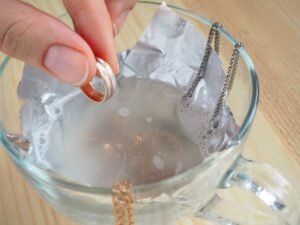
The classic aluminum-foil method works by reversing the tarnish through a chemical reaction. It’s safe for sterling and silver-plated pieces, but should not be used on oxidized (intentionally darkened) silver.
Set Up the Cleaning Bath
Line a glass or ceramic dish with aluminum foil, shiny side up. The foil is essential, the tarnish transfers from the silver to the foil during the process.
Bring enough water to a boil to fully submerge the silver. Pour it into the foil-lined bowl.
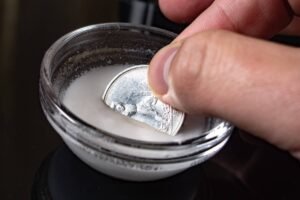
Add Baking Soda and Salt
Add 1/4 cup of baking soda and 2 teaspoons of kosher salt. The mixture may fizz as it activates.
Submerge the Silver
Place the silver pieces into the hot solution, making sure each piece touches the foil. Contact with the foil triggers the tarnish-removal reaction.
Let It Soak
Leave the items for 5–10 minutes. For deeper tarnish, a little extra time is fine. You may see the tarnish lift off almost immediately.
Rinse and Dry
Remove items with plastic or rubber tongs, rinse with cool water, and dry right away with a soft cloth.
This method is ideal for silver that has turned very dark or hasn’t been cleaned in a long time.
Comparison Table: Which Silver Cleaning Method Should You Use?
| Cleaning Method | Best For | Advantages | Drawbacks |
| Mild Dish Soap + Warm Water | Light dirt, everyday maintenance | Gentle, gemstone-safe, easy to repeat often | Won’t remove deep tarnish |
| Baking Soda + Foil Reaction | Heavy tarnish on silver or silver-plated items | Fast, non-abrasive, dramatic results | Not safe for oxidized silver |
| Silver Polishing Cloth | Quick touch-ups | Perfect for mild tarnish and fingerprints | Cannot restore heavily tarnished items |
| Silver Cream Polish | Flatware, household silver | Adds a slight protective layer | Requires more effort and buffing |
| Commercial Silver Dip | Severe tarnish | Works very quickly | Can dull silver and damage porous stones |
Long-Term Care to Keep Silver Shining
Cleaning is only half the battle. Good storage and habits prevent tarnish from returning quickly.
Store Silver Properly
Silver lasts longer in a cool, dry, airtight space. Anti-tarnish bags, flannel pouches, or sealed containers help limit exposure to air.
Use Moisture Absorbers
A silica gel packet or even a small piece of chalk absorbs humidity and slows tarnish formation.
Avoid Chemicals and Chlorine
Perfume, lotion, hair products, household cleaners, and especially chlorinated water can darken silver quickly. Removing jewelry before exposure makes a noticeable difference.
Wear Silver Often
Skin oils naturally help protect silver. Interestingly, silver pieces worn regularly stay shiny longer than those that sit in storage.
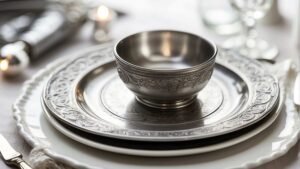
Special Considerations for Different Silver Items
Not every item can be cleaned the same way. Silver with gemstones, antique finishes, or plating may need extra care.
Silver Jewelry with Gemstones
Porous stones, like pearls, opals, turquoise, emeralds, or amber, should never be exposed to hot water or chemical reactions. Stick to mild dish soap and warm water only.
Silver-Plated Pieces
These can be cleaned with both the light method and the baking soda foil method, but avoid excessive rubbing, which can wear down the thin layer of silver plating.
Oxidized or Antique Silver
Some silver pieces intentionally have darkened details for an antique look. Avoid baking soda foil treatments or silver dips because they can remove this artistic finish. Use mild soap and a soft cloth instead.
Frequently Asked Questions
1. How often should silver be cleaned?
It depends on use and exposure. Silver that’s worn or handled weekly may need a light cleaning every couple of weeks. Silver stored in airtight bags may only need care every few months.
2. Is toothpaste safe for cleaning silver?
No. Toothpaste is abrasive and can leave scratches. It was once a common suggestion, but experts no longer recommend it for silver care.
3. Can baking soda scratch silver?
Baking soda is safe only when used in the hot-water and foil reaction. Baking soda pastes, where it’s rubbed directly onto the surface, are abrasive and can scratch.
4. What’s the safest way to clean silver jewelry with gemstones?
Use warm water, mild dish soap, and a soft brush. Avoid heat, foil methods, and dips on porous or glued stones.
Final Thoughts
Silver doesn’t need fancy cleaners or harsh chemicals to look its best again. Once someone understands how to clean silver the right way, whether it’s a simple soap-and-water soak for everyday upkeep or the aluminum-foil method for stubborn tarnish, the whole process feels effortless.
With a little consistency, smart storage habits, and a few minutes of care here and there, silver stays bright, reflective, and beautiful for years.
It becomes less of a chore and more of a quick routine that preserves pieces people actually enjoy. Over time, that small effort keeps sentimental items and everyday favorites looking as stunning as the day they arrived.