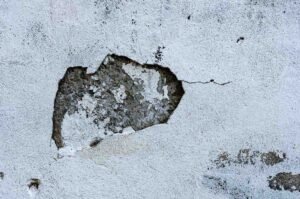
Every home tells a story, and drywall often takes the hits, literally. Maybe a doorknob punched through the wall, a picture frame came down too fast, or a nail pop showed up out of nowhere. Whatever the reason, those marks don’t have to stay. Repairing drywall isn’t complicated once you match the technique to the size of the damage.
Tiny cracks, mid-sized holes, and larger wall openings each follow their own repair playbook, and a little know-how can bring a wall back to looking brand new.
Once homeowners learn the basics, they’re often surprised by how quickly a damaged wall can be restored. It’s one of those DIY projects that delivers instant satisfaction with just a bit of effort.
How to Choose the Right Drywall Repair Method
Different types of wall damage require different repair approaches. Here’s a quick breakdown homeowners can use before starting:
Drywall Repair Method Comparison
| Damage Type | Typical Size | Recommended Fix | Core Materials |
| Hairline cracks, nail pops | < 1 inch | Spackle repair | Spackle, putty knife, fine-grit sandpaper, primer |
| Small holes | 1–2 inches | Spackle or mesh patch | Spackle, putty knife, optional mesh patch |
| Medium holes | 2–6 inches | Mesh patch or California patch | Mesh patch or scrap drywall, joint compound, tape |
| Large holes | 6 inches or larger | Full drywall cut-and-patch | Drywall piece, wood backing, screws, mesh/paper tape, mud |
Once the damage category is clear, the repair becomes straightforward.
How to Repair Small Holes and Cracks
Small drywall blemishes, such as nail pops, dents, and fine cracks, are the easiest to fix and require only basic materials. These minor imperfections don’t demand advanced tools or professional skills, making them ideal beginner-friendly repairs. With just a bit of prep and the right technique, they can be patched and blended into the wall in no time.

Clean and Prep the Area
Lightly sand the damaged spot to remove loose drywall paper and debris. Wipe it with a damp cloth to remove the spackle properly.
Apply Spackle
Use a putty knife to press spackle into the hole or crack. Spread it slightly beyond the damaged area to create an even surface.
Smooth the Surface
Wipe the knife clean, dip it in water, and glide it gently over the patch. This reduces the amount of sanding needed later.
Let It Dry
Fast-dry spackle may be ready in 15 minutes. Standard formulas take longer. Drying thoroughly prevents future cracking.
Sand, Prime, and Paint
Once dry, lightly sand the patch until it blends with the wall. Prime before paintingotherwise, the patched spot will show through.
This method is ideal for handling everyday wall imperfections quickly and effectively.
How to Repair Medium Drywall Holes (2–6 Inches)
Medium-sized holes need more reinforcement than simple spackle can provide. They sit in that in-between zone where the wall needs support but not a full structural rebuild. With the right patching method, they can be repaired cleanly and securely.
Using a Mesh Patch
Self-adhesive mesh patches stick directly over the hole. Apply joint compound over the mesh, feathering the edges outward. After drying, add a second (and sometimes third) coat. Sand smooth, prime, and paint.
Using a California Patch
A California patch uses a scrap of drywall with the back gypsum trimmed away, leaving only the front paper as a flange. That paper acts like built-in tape when embedded in joint compound, creating a smooth, durable finish.
Both approaches work well for moderate damage without having to cut out a full replacement piece.
How to Repair Large Drywall Holes
Large holes, typically six inches or more, require replacing the damaged section with new drywall. This method closely follows the structured process provided earlier.
Cut a Clean Opening
Use a utility knife or drywall saw to cut the damaged section into a square or rectangle. Clean edges make the patch fit more precisely.
Install Wood Backing
Slide a piece of 1×4 lumber behind the wall opening and secure it to the existing drywall using screws. This backing provides stability for the new patch.
Insert the Drywall Patch
Cut a new piece of drywall to fit the opening exactly. Screw it into the backing or into studs.
Tape the Seams
Apply mesh or paper tape across all seams. This prevents cracks from forming along the edges later.
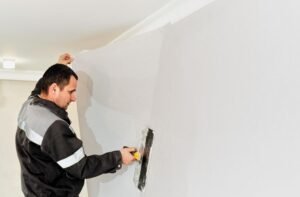
Apply Joint Compound
Use a putty knife to apply joint compound:
- First coat: embed the tape
- Second coat: extend beyond the first coat
- Third coat: feather the edges for a seamless finish
Allow each layer to dry fully before adding the next.
Sand, Prime, and Paint
Sand the dried compound until it’s smooth. Prime the repaired area before applying wall paint for a uniform finish. This full patching method is the same approach used by professional drywall installers.
Safety Essentials for Drywall Repair
Even small drywall projects require attention to safety:
- Use a dust mask or N95 when sanding.
- Wear protective goggles during cutting or sanding.
- Gloves help protect hands from sharp drywall edges.
- Keep the work area ventilated.
- Vacuum dust with a HEPA vacuum or wipe surfaces with a damp cloth.
These simple steps make the repair environment cleaner and safer.
Common Drywall Repair Mistakes to Avoid

A few common errors can make patches noticeable:
- Applying too much compound, which leads to heavy sanding
- Not feathering edges wide enough to blend with the wall
- Sanding through the compound and exposing the tape
- Skipping primer before painting
- Not allowing each mud coat to dry completely
Avoiding these mistakes ensures a smooth, professional-looking finish.
FAQs About How to Repair Drywall
What’s the easiest way to know which repair method to use?
Always look at the size of the damage. Fine cracks and nail pops use spackle. Medium holes need mesh or California patches. Large holes require cutting out the section and patching with new drywall.
Can spackle fix every type of hole?
No. Spackle is perfect for small openings but lacks the strength for larger holes. Anything over 2 inches typically requires mesh reinforcement or a full drywall patch.
How long does the whole drywall repair process take?
Small repairs can be completed in under an hour. Medium and large repairs often take a day or two because joint compound must dry completely between coats.
When should someone call a professional?
If the wall shows signs of moisture, electrical wiring is visible, or the damage covers a large section, a professional should evaluate it before repair.
Final Thoughts on How to Repair Drywall
Learning how to repair drywall gives homeowners real control over how their space looks and feels. It’s one of those skills that instantly elevates the appearance of any room. From quick spackle fixes to full drywall replacement, each method becomes far less intimidating when the right steps are followed.
With clean prep work, careful layering, and proper priming, repairs blend into the wall naturally, exactly the way they should. The best part is that every successful repair builds confidence for the next project. Before long, even bigger fixes feel completely doable.